Junk Trunk to Coffee Table....Easy!
Good Morning!

I am happy to share my DIY coffee table project. I hope you like it!
I have a beautiful glass-topped and metal base coffee table that I somehow manage to bang my shin into every.single.day. No joke. My left leg looks like I was in ten rounds with a dragon. I decided to buy a new coffee table, preferably one with storage for my driftwood hoarding problem. The only thing stopping me was that I'm always "funds-impaired."
I saw a pretty rough footlocker/trunk for sale on Facebook's "Marketplace." Luckily it was still available for the bargain price of $5.00. SCORE!! I brought it home. The black fabric covering it was torn in places and it was missing a portion of the locking latch. Big deal. If your friends comes over and notices a missing portion of the locking latch on your footlocker/trunk coffee table, they aren't your friends!
Here is the footlocker before:


I can see in my head what it's going to look like when I'm done, so let's get going!
Step one: I removed all the black fabric. It came off easy peasy.


Step one: I removed all the black fabric. It came off easy peasy.


Step two: I wrapped the leather handles with masking tape, and then took the trunk outside. I painted the entire thing with Rustoleum Aluminum spray paint. That paint made the chip board pretty interesting looking and I was almost tempted to leave it like that. But no.


Step three: I went fabric shopping. I opted for fabric because the trunk's chip board was uneven. Paper would not be thick enough to make a smooth surface. Since I have four grandchildren, I knew an outdoor fabric would hold up better than anything else. I finally found a beautiful muted coastal fabric made by Solarium called "Luba Sandstone". I purchased a yard and a half on sale, all for $14.00. YAY!

Step four: I measured the top and cut a piece equal to the top with about 1" extra in length and 1" extra in width. I measured the sides and added one inch to the length and width as well, and cut those four pieces. Further, I took each side section and cut off a more narrow piece (mine was about 2 1/4") from the top edge of each side sections, since each size had two separate areas to work on. Cutting each side piece into two pieces also meant I could match up the top section with the bottom section to keep the fabric's design consistent.


Step five: I used a liquid clear glue similar to E6000 but with a better liquid viscosity for this project. It's called Beacon Multi-Grip. (It's used for marine applications and household applications and it dries super clear.) I used a bottle and a half. Two bottles cost $10.00

I squeezed the glue out all along the corner edging and then squeezed the glue all over the surface, working one side of the trunk at a time. I spread it out with a silicone spatula that I keep for crafting. Then carefully, I placed the fabric onto the glue. I used a styrofoam tray (I save all the styrofoam trays from meat and chicken packaging and use them for everything!) and pushed it down onto the fabric to flatten out any glue bumps and bubbles. The tray worked great because it slid smoothly over the surface. Then I carefully used a razor knife to trim the fabric around the corner trunk trim and latches. That took a long time. I also used a butter knife to nudge the edges of the fabric under the corner edging as best I could. (I wasn't too worried about it tho because I plan on replacing the plastic corner edging with brand new metal edging soon.)


Step six: I got out my Ryobi drill and drilled a 1/2" hole in each corner of the bottom of my trunk. I had four stem casters left over from another project, so I used those instead of buying some new casters. If you purchase new casters, depending upon the size, it would cost you between $12 and $20. I purchased eight washers and four nuts to fit my casters at Ace Hardware near me in Westport, MA. I held one washer onto the outside bottom of the trunk, pushed the stem caster thru the bottom and the washer, added another washer onto the stem of the caster the inside of the trunk and screwed on the nut. VOILA! A trunk coffee table on wheels!


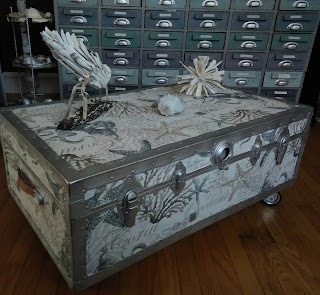
So here it is!

 I LOVE LOVE LOVE IT. I'd marry it, if I could. After cleaning the inside of the footlocker (which was in pretty great shape) I put a few blankets and pillows in there for storage. Yahooooooo!! Storage is always a good thing.


I hope you try this yourself. It wasn't so difficult. It just took patience. I will post an update photo when I replace the plastic corner edging with metal edging. I've got an appointment at a metals showroom next week. :D
Have a great day!
Vee


Comments
Post a Comment